


Imagine walking into your basement, a space you’ve spent thousands of dollars renovating into a cozy home theater or a home gym, only to realize that an invisible, odorless, and tasteless guest has moved in with you. This isn’t a ghost story; it’s a geological reality. Radon gas, a byproduct of decaying uranium in the soil, is the second leading cause of lung cancer worldwide.
In my decade of crawling through tight crawlspaces and inspecting suburban foundations, I’ve seen homeowners spend a fortune on high-end air purifiers that do absolutely nothing for radon. To stop this silent threat, you don’t need a filter; you need a vacuum. Specifically, you need a properly engineered Radon Mitigation Fan system.
The Science of Sub-Slab Depressurization
To understand how a Radon Mitigation Fan works, think of your house like a giant straw sitting in a milkshake of soil. Because the air inside your home is typically warmer than the soil beneath it, your house creates a “stack effect,” effectively sucking gasses out of the ground through microscopic cracks in the foundation.
The goal of a mitigation system is to reverse this pressure. By installing a dedicated fan, we create a permanent low-pressure zone beneath the concrete slab. We are essentially telling the radon, “Don’t go into the living room; follow the path of least resistance through this pipe and out into the atmosphere.”
Why You Can’t Just Use Any Fan
I often get asked if a high-powered bathroom exhaust fan can do the job. The answer is a firm “No.” A true Radon Mitigation Fan is a specialized centrifugal unit designed for continuous 24/7 operation. These fans are built to handle moisture and varying pressure loads without burning out. They aren’t just moving air; they are maintaining a structural pressure barrier between your family and the earth.
Anatomy of a Professional Radon Mitigation Fan Installation
A standard Active Soil Depressurization (ASD) system consists of several critical components that must work in harmony. If one link in this chain is weak, the entire system fails to protect you.
1. The Suction Pit (The Heart of the System)
Before the pipe goes in, we dig out a small cavity under the slab—usually about five gallons worth of soil. This creates a “void” where air can collect. Without this pit, the fan would be trying to suck air through packed dirt, which is like trying to breathe through a wet towel.
2. PVC Piping and Routing
We typically use 3-inch or 4-inch Schedule 40 PVC. The trick is the pitch. Based on my experience, the most common DIY failure is not angling the horizontal pipes back toward the suction pit. Since radon air is humid, condensation will form inside the pipe. If that water “puddles” in a flat section of the pipe, it creates a gurgling sound and eventually blocks the airflow entirely.
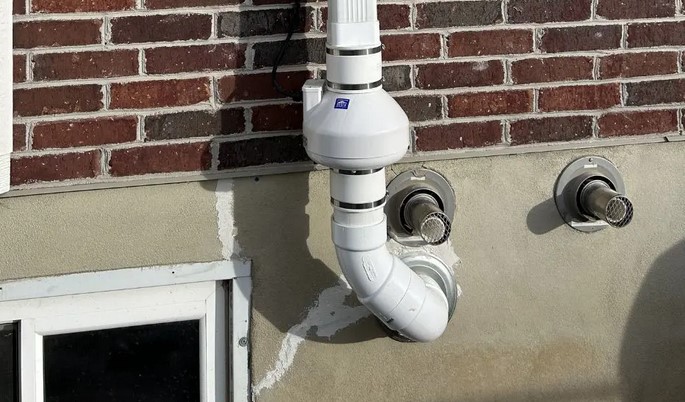
3. The Radon Mitigation Fan Placement
The fan should never be located inside the living envelope of the house (like the basement or a closet). If the pipe on the “discharge” side of the fan develops a leak, it would blow concentrated radon directly into your home. We always install the fan in an attic, a garage, or on the exterior of the house.
Selecting the Right Radon Mitigation Fan for Your Footprint
Not all fans are created equal. Choosing the right one depends on what is under your house. In the industry, we look at “Static Pressure” and “Airflow.”
-
For Gravel Sub-layers: If your home was built on a thick bed of clean gravel, air moves easily. You need a high-airflow, low-pressure fan.
-
For Tight Clay or Sand: If you have dense soil, the fan has to work much harder. You’ll need a high-suction (high static pressure) fan.
In my years of testing, I’ve found that using a “beast” of a fan on a gravel base is just a waste of electricity and creates unnecessary noise. Precision beats power every time.
Monitoring Success: The U-Tube Manometer
How do you know the system is working? You look at the “u-tube.” This is a small clear tube filled with colored liquid mounted to the PVC pipe in your basement.
It’s a simple pressure gauge. If the liquid levels are uneven, it means the Radon Mitigation Fan is successfully creating suction. If the levels are even, the fan has failed or been turned off. I always tell my clients: “Check the blue liquid once a month. If it’s level, give me a call.”
Expert Advice: The “Hidden” Pre-Mitigation Step
Before you even touch a drill, you must seal the “entry points.” A Radon Mitigation Fan is only as efficient as the “envelope” it’s working against.
-
Sump Pump Crocks: These are massive holes in your floor. They must be fitted with an airtight, bolt-down lid.
-
Expansion Joints: That thin line where your floor meets the wall? Seal it with professional-grade polyurethane caulk.
-
Floor Cracks: Even a hairline crack can act as a leak in your “vacuum” system, forcing the fan to work harder than necessary.
Pro Tip: Never use standard silicone for sealing foundation cracks. It won’t bond well enough to the concrete over time. Use a high-quality, self-leveling polyurethane sealant. It stays flexible and maintains the airtight seal needed for the system to function.
Maintenance and Long-Term Reliability
One of the best things about a modern Radon Mitigation Fan is its longevity. Most high-quality units are rated for 5 to 10 years of continuous operation. However, “set it and forget it” is a dangerous mindset when dealing with a carcinogen.
We recommend a professional radon re-test every two years. Foundations settle, new cracks form, and fans eventually lose RPMs. A re-test ensures that while the fan is spinning, it is still effectively keeping your levels below the EPA’s action level of 4.0 pCi/L (though I personally aim for under 2.0 pCi/L for my clients).
Common Troubleshooting: Noise and Vibration
A frequent complaint from homeowners is a humming sound vibrating through the walls. This usually happens when the fan is bolted directly to the house framing without isolation.
To fix this, we use flexible rubber couplings (often called Fernco couplings) to attach the fan to the PVC pipe. These act as shock absorbers, preventing the fan’s mechanical vibration from turning your house’s studs into a tuning fork.
Summary: A Breath of Fresh Air
Installing a Radon Mitigation Fan system is one of the most impactful “invisible” upgrades you can make to your home. It isn’t as flashy as a new kitchen island, but it provides something far more valuable: peace of mind. By creating a vacuum beneath your feet, you’re ensuring that the air your family breathes is coming from your HVAC system, not the decaying elements in the soil.
If you haven’t tested your home for radon in the last two years, that is your first step. Don’t wait for a renovation to prioritize your indoor air quality.
Have you checked your radon levels recently, or are you noticing a “gurgling” sound in your existing system? Share your experiences or questions in the comments below, and let’s get your home’s air back to being safe and clean!


+ There are no comments
Add yours