


Imagine walking out to your backyard oasis on a scorching mid-summer afternoon, only to find the water level has mysteriously dropped by two inches overnight. That sudden knot in your stomach is a universal homeowner experience. Over my past ten years in the home improvement trenches—specializing in custom backyard renovations and structural leak remediation—I’ve walked panicked homeowners through this exact scenario countless times.
A leaking pool isn’t just an annoyance; it’s a silent threat to your property’s foundation, your utility bills, and your weekend peace of mind. Fortunately, you don’t always need to drain thousands of gallons of water or shell out a small fortune for a complete liner replacement. Often, the ultimate hero of your backyard is a simple, high-grade pool liner patch.
Let’s dive into how you can diagnose, address, and permanently fix minor tears like a seasoned professional.
Decoding the Culprit: Why Vinyl Liners Fail
Think of your pool’s vinyl liner like the inner tube of a high-performance bicycle tire. It is engineered to stretch, flex, and endure harsh UV rays and chemical treatments, yet it remains fundamentally vulnerable to sharp intrusions.
In my experience, punctures rarely happen due to manufacturing defects. More often, they are caused by:
-
Overzealous canine paws looking for a refreshing dip.
-
Fallen tree branches or sharp garden debris blown in during a storm.
-
Aggressive scrubbing with abrasive brushes during spring opening.
-
Age-related brittleness where the plasticizers in the vinyl have leached out over time.
When a breach occurs, hydrostatic pressure pushes the pool water out through the microscopic gap, creating a steady stream of water loss. Ignoring it can lead to washed-out soil beneath your pool walls, resulting in catastrophic structural warping. This is where mastering the pool liner patch becomes an essential homeowner superpower.
The Anatomy of a Leak: How to Spot the Trouble
Before you can apply a fix, you have to find the enemy. Water evaporation is normal, but losing more than a quarter-inch per day points straight to a structural compromise.
-
The Bucket Test: Place a bucket filled with pool water on the second step of your pool, matching the water level inside and outside the bucket. If the pool water drops faster than the bucket water after 24 hours, you have a leak.
-
The Dye Test: Mix a small squeeze bottle of phenol red or specialized pool leak detection dye near suspected areas (seams, skimmers, or stairs). Turn off the filtration system so the water is completely still, and gently squeeze the dye near the liner. If the colored plume gets sucked into a specific spot, you’ve found your target.
Selecting Your Arsenal: Choosing the Right Pool Liner Patch Kit
Not all repair materials are created equal. Walking into a hardware store and grabbing whatever is on the shelf can lead to a messy, peeling disaster within a week.
When choosing a pool liner patch kit, look for specific technical attributes:
-
Heavy-Duty Vinyl Thickness: Ensure the patch material matches or exceeds the gauge of your existing liner (typically 20 to 30 mil).
-
Underwater Vinyl Adhesive: The glue must cure in a wet environment without dissolving or breaking down under heavy chlorine concentrations.
-
UV-Resistant Formulation: Clear vinyl patches work wonders for blending into patterned liners, but ensure they are rated to withstand direct sunlight without turning yellow or brittle.
Pro Tip: Never use household super glue or duct tape for an underwater pool repair. The chemical composition of pool water will dissolve standard adhesives almost instantly, leaving behind a sticky residue that makes a proper future patch much harder to apply.
Step-by-Step Mastery: Applying a Pool Liner Patch Like a Professional
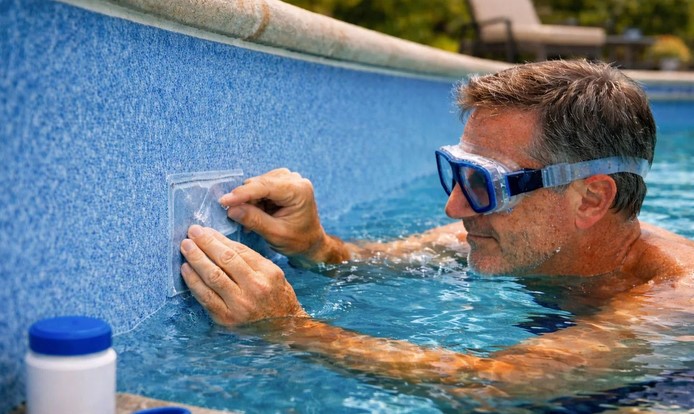
Applying a pool liner patch underwater requires a steady hand and strict attention to surface preparation. Follow this tested workflow to ensure a permanent bond:
-
Clean the Surface: Algae and biofilm prevent adhesives from gripping. Use a non-abrasive scrub pad to thoroughly clean a 3-inch radius around the tear.
-
Cut the Patch: Snip out a rectangular piece of vinyl patch material. Crucial detail: Always round the corners of your patch with scissors. Square corners act as stress concentrators and will catch on pool cleaners, feet, or brushes, causing the patch to peel prematurely.
-
Apply the Adhesive: Spread a generous, even layer of the specialized underwater vinyl glue across the back of the patch. Fold the patch slightly in half (adhesive side in) so it doesn’t prematurely stick to your fingers or the water column as you descend.
-
Submerge and Position: Take a deep breath, dive down to the leak, and unfold the patch directly over the tear.
-
Press Out Air Bubbles: Press firmly from the center outward to push out any trapped water pockets and air bubbles. A secure seal relies entirely on maximizing surface contact between the adhesive and the liner.
Hidden Traps: Avoiding Common DIY Mistakes
Even enthusiastic DIYers can stumble if they miss the subtle nuances of vinyl repair. Here are a few hidden warnings from my decade on the job:
-
Watch the Water Temperature: If your pool water is below 60°F (15°C), vinyl loses its flexibility, and the curing process of the adhesive slows down drastically. Try to perform repairs during the warmest part of the day.
-
Don’t Over-Glue: Applying too much adhesive doesn’t make the bond stronger; it squeezes out excess glue that attracts dirt and creates an unsightly ring around the repair.
-
Know When to Call It Quits: A pool liner patch is designed for tears up to 3 to 4 inches long or small punctures. If you are dealing with a seam separation longer than a foot or a brittle, dry-rotted liner that cracks at the touch, patching is merely a band-aid on a sinking ship. In those cases, total liner replacement is the safer, smarter investment.
Conclusion: Take Control of Your Backyard Oasis
Preserving the structural integrity of your pool doesn’t require an engineering degree or an endless budget. By acting quickly, diagnosing leaks accurately, and applying a professional-grade pool liner patch, you can protect your investment and get back to enjoying your summer in no time.
Have you ever tackled a pool leak yourself, or are you currently hunting down a mysterious water drop in your backyard? Drop a comment below with your pool challenges, and let’s troubleshoot your setup together!








+ There are no comments
Add yours