


You’ve spent weeks scrolling through Pinterest, admiring those high-end boutique hotels with their bold, textured feature walls, only to look at your own “eggshell white” bedroom and sigh. You want that premium look, but a full room renovation could easily swallow $5,000, and your landlord—or your bank account—isn’t having it. What if I told you that 80% of a room’s visual impact comes from just 20% of its surface area?
In my decade of flipping houses and consulting on interior refurbishments, I’ve seen homeowners make the mistake of thinking “more is more.” They try to decorate every corner, resulting in a cluttered mess. I’ve found that the most sophisticated spaces rely on a single, intentional focal point. Mastering a Wallpaper Accent DIY is the single most effective way to “brand” your home’s aesthetic without the commitment of a construction crew.
The Psychology of the Accent Wall: Why It Works
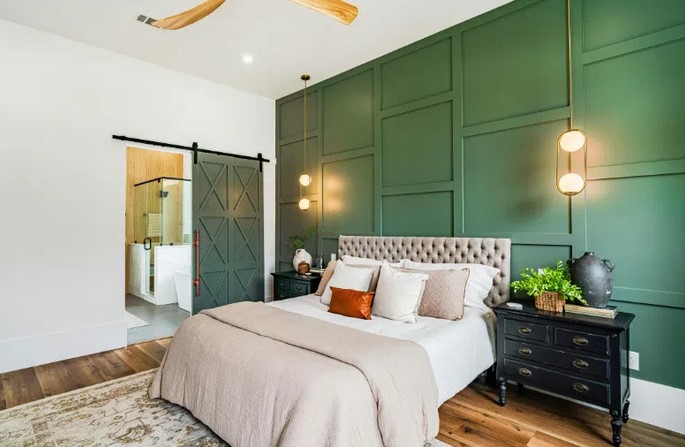
An accent wall acts as the “anchor” for your furniture and lighting. In the industry, we call this “visual zoning.” By applying a bold pattern or a deep texture to just one wall, you are telling the eye exactly where to land. This creates a sense of order and purpose in an otherwise plain room.
I remember a client back in 2018 who wanted to paint her tiny home office navy blue. I advised against it; four dark walls would have turned that room into a cave. Instead, we did a Wallpaper Accent DIY on the wall behind her desk using a metallic geometric print. The result? The room felt twice as deep, and her Zoom background suddenly looked like a million-dollar executive suite.
The Suit Analogy
Think of wallpapering an entire room like wearing a full tuxedo—it’s high-maintenance, expensive, and sometimes a bit too much for everyday life. A Wallpaper Accent DIY, on the other hand, is like a perfectly tailored silk tie or a statement watch. It provides that pop of luxury and “branding” to your space while keeping the rest of the outfit (the other three walls) clean and breathable.
Selecting Your Weapon: Peel-and-Stick vs. Non-Woven
Before you buy that roll of paper, you need to understand the logistics of the material. Not all wallpaper is created equal, and your choice depends entirely on your “exit strategy.”
1. Peel-and-Stick (Self-Adhesive Vinyl)
This is the darling of the DIY world. It’s essentially a giant sticker.
-
Pros: Repositionable, great for renters, and no messy paste.
-
Cons: It can be finicky in high-humidity areas (like bathrooms) and requires a perfectly smooth surface.
2. Non-Woven (Paste-the-Wall)
This is what I use for 90% of my professional installs. Instead of soaking the paper in a tray of water, you apply the adhesive directly to the wall.
-
Pros: Extremely durable, breathable (prevents mold), and hides minor wall imperfections much better than vinyl.
-
Cons: It requires a bit more cleanup and a steady hand for trimming.
Technical Execution: The Logistics of a Flawless Install
Most people fail at Wallpaper Accent DIY because they start in the corner. That is the first mistake. Houses settle over time, and corners are almost never perfectly vertical (plumb). If you start at a crooked corner, your pattern will be tilted across the entire wall.
The Plumb Line Secret
I always start my projects by drawing a perfectly vertical line using a level or a plumb bob, exactly one roll-width away from the corner. I align my first strip to this line. This ensures that even if the corner of the room is leaning, the pattern in the center of the wall—where everyone looks—is perfectly straight.
Managing the Pattern Match
There are three types of “matches” in the wallpaper world:
-
Random Match: No alignment needed (think grasscloth or vertical stripes).
-
Straight Match: The pattern aligns horizontally across strips.
-
Drop Match: The pattern staggers diagonally.
Pro Tip: Always buy 15% more wallpaper than your square footage suggests if you are using a “Drop Match.” You lose a lot of material trying to align those intricate floral or geometric prints.
Modernizing Your Space: Beyond the Bedroom
While most people think of the bedroom headboard, a Wallpaper Accent DIY can solve “logistics” issues in other parts of the house:
-
The Kitchen Pantry: Give your pantry a “designer grocery” feel with a bright, citrusy pattern.
-
The Powder Room: Since it’s a small space, you can afford a high-end designer paper. It turns a utility room into a “jewel box.”
-
The Entryway Nook: Create a sense of “arrival” by wallpapering the wall where you hang your coats and keys.
Expert Advice: The “Invisible” Surface Prep
The secret to a wallpaper job that looks professional—meaning no bubbles and no peeling seams—isn’t the paper; it’s the wall underneath.
Never apply wallpaper over “flat” builder-grade paint without priming first. Flat paint is incredibly thirsty; it will suck the moisture out of your wallpaper paste before you have time to slide the paper into position. I always apply a “Wallpaper Primer” or a “Sizer.” It creates a smooth, slick surface that allows you to slide the paper like a puck on an ice rink, giving you time to get that pattern match perfect.
Tool Kit Checklist for Beginners:
-
Snap-off Utility Knife: You need a surgically sharp blade. I snap off a new tip for every two vertical strips I cut. A dull blade will tear the wet paper.
-
Smoothing Tool: A plastic squeegee for vinyl or a soft brush for non-woven.
-
Seam Roller: A tiny tool that makes the edges of the paper “disappear” into each other.
-
Damp Sponge: To wipe away excess paste immediately. If paste dries on the front of the paper, it can ruin the finish.
Maintenance and Longevity
Modern wallpapers are remarkably resilient. For a Wallpaper Accent DIY in high-traffic areas, look for “scrubbable” or “washable” ratings.
In my own home, I have a textured vinyl accent wall in the hallway. It has survived three dogs and a toddler because I can simply wipe it down with a damp microfiber cloth. Unlike paint, which can scuff and require a full repaint, a high-quality wallpaper can look brand new for 10 to 15 years if the seams were rolled correctly during installation.
Summary: Your Space, Your Brand
A home should feel like a reflection of your personality, not a carbon copy of a furniture catalog. By taking a Saturday to tackle a Wallpaper Accent DIY, you are taking control of your home’s “branding.” It’s a low-risk, high-reward project that teaches you the importance of precision, patience, and the power of a good focal point.
Don’t be intimidated by the “wallpaper disasters” of the 1970s. Today’s materials and adhesives are designed for the modern DIYer who wants maximum aesthetic impact with minimal structural headache.
Are you leaning toward a bold geometric print or a subtle organic texture for your next project? Or maybe you’re worried about how to handle that tricky radiator on your accent wall? Ask your questions in the comments below, and let’s get your walls looking world-class!


+ There are no comments
Add yours