



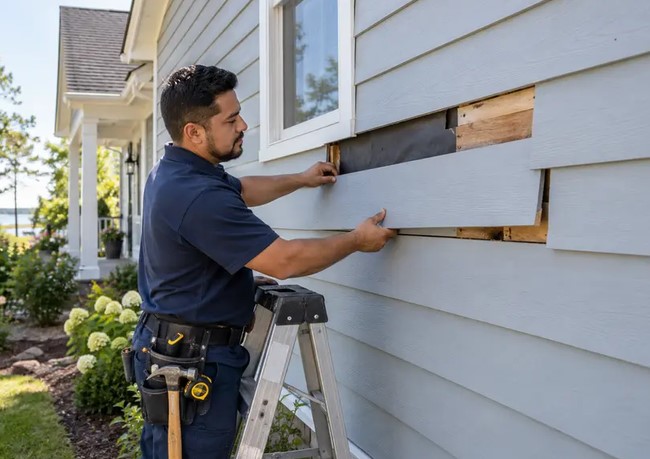
 Picture this: you’re mowing the lawn on a crisp Saturday morning when a stray pebble shoots off the blade, hitting your house with a sharp thwack. You walk over, move the grass clippings, and there it is—a jagged, thumb-sized hole right at eye level on your exterior wall. Or maybe it was a rogue baseball, a ladder mishap, or winter freeze-thaw cycles that finally cracked a brittle panel.
Over my ten years in the home improvement industry, fixing exterior wall compromises has been one of the most common service calls I’ve received. Most homeowners panic, assuming they need to rip off half the wall or spend thousands hiring a contractor. But in reality, a small hole or crack doesn’t have to trigger a massive renovation bill if you know how to use a high-quality siding patch kit.
Let’s take a deep dive into how your exterior cladding works, why quick repairs matter, and how you can restore your home’s shield like a seasoned pro.
The Silent Danger of Minor Exterior Holes
Think of your home’s siding as a raincoat. When it’s fully intact, water rolls right off, keeping everything dry underneath. But the second you poke a tiny pinhole through that raincoat, moisture starts seeping through to your clothes.
In residential construction, vinyl, fiber cement, or wood siding acts as the primary weather barrier. Behind it sits the house wrap and structural sheathing. When a breach occurs, water doesn’t just sit in the hole; wind drives it behind adjacent panels.
From what I’ve witnessed on structural inspections, even a minor crack left open through a rainy season can lead to:
-
Trapped moisture causing hidden timber rot in OSB wall sheathing.
-
Mold and mildew growth inside the wall cavity, posing health risks.
-
Thermal bridging and drafts, quietly inflating your monthly energy bills.
-
Insect intrusion, giving ants, wasps, and termites a free pass inside.
Catching these damage spots early and sealing them with an effective siding patch kit is the ultimate key to avoiding multi-thousand-dollar structural repairs down the road.
Anatomy of an Effective Siding Patch Kit
When you head down the hardware store aisle, you’ll see dozens of repair compounds, fillers, and tapes. Choosing the right siding patch kit depends heavily on your siding material (vinyl, fiber cement, engineered wood, or aluminum). However, a complete, professional-grade kit generally includes three core components:
-
Structural Mesh or Backing Support: A self-adhesive fiberglass mesh screen that spans the void and gives your filler material something to grip.
-
Flexible Exterior Compound or Putty: A specialized polymer or resin matrix designed to expand and contract with outside temperature fluctuations.
-
Surface Primer & Color-Matched Coating: Ensures the patched area blends seamlessly into the surrounding texture and resists UV degradation.
+--------------------------------------------------------+
|               HOW A SIDING PATCH WORKS                 |
+--------------------------------------------------------+
| [ External Layer ]  Color-Matched Paint / UV Coating    |
| [ Middle Layer   ]  Flexible Repair Compound / Filler   |
| [ Base Layer     ]  Fiberglass Reinforcement Mesh       |
| [ Wall Surface   ]  Damaged Vinyl or Fiber Cement Board |
+--------------------------------------------------------+
Key Technical Terms (LSI Keywords) to Know
To understand exterior repairs like an expert, it helps to know the terminology:
-
Thermal Expansion Coefficient: The rate at which vinyl or composite materials expand during summer heat and contract during winter cold.
-
J-Channel & Lap Joint: The mounting channels and overlapping joints that secure siding panels together.
-
Substrate / Sheathing: The underlying wooden plywood board beneath the external siding panels.
-
Caulk and Elastomeric Sealant: Flexible waterproof fillers used to prevent water ingress around trim and seams.
Step-by-Step Guide: Executing a Flawless Patch Repair
Whether you are working with vinyl or fiber cement, following a methodical repair process makes all the difference between an invisible repair and an ugly eyesore.
Step 1: Surface Preparation and Cleaning
A patch will never adhere properly to oxidized vinyl, dust, or mold.
-
Clean the damaged area with isopropyl alcohol or a mild detergent solution.
-
Scrape away any loose, flaking plastic or chipped material around the hole edges using a utility knife.
-
Allow the surface to dry completely before applying any adhesives.
Step 2: Setting the Reinforcement Mesh
If your hole is larger than half an inch, filling it directly with putty will cause the compound to sag inside the wall cavity.
-
Cut a piece of fiberglass mesh from your siding patch kit so it extends at least 1 inch past the damage on all sides.
-
Peel the backing and press it firmly over the hole, smoothing out any wrinkles.
Step 3: Applying the Repair Compound
-
Using a plastic putty knife, push the repair compound through the mesh screen to fill the void beneath.
-
Feather the edges outward so the compound tapers smoothly into the natural texture of the surrounding panel.
-
Rule of thumb: Apply two thin layers rather than one thick layer to prevent cracking as the material cures.
Step 4: Sanding and Texturing
-
Once fully cured (typically 2 to 4 hours depending on humidity), lightly sand the repair with 220-grit sandpaper.
-
If your siding has a realistic wood-grain texture, take a soft wire brush or stippling sponge while the second layer is slightly tacky to mimic the surrounding grain lines.
Step 5: Priming and Painting
-
Apply an exterior-grade acrylic primer over the patch.
-
Paint the spot using exact color-matched exterior paint. (If you don’t have leftover paint, peel a small 1-inch chip of loose siding and take it to your local paint store for a digital match).
Expert Advice: Pro Tips & Hidden Warnings
PRO TIP: The Warm Day AdvantageAlways attempt vinyl siding repairs on a warm, sunny afternoon (above 65°F / 18°C). Cold vinyl becomes brittle like glass, meaning pressure from your putty knife or sander can cause fresh cracks around your repair site. Warm vinyl, on the other hand, is forgiving and flexes naturally under work pressure.
⚠️ Hidden Warning: Beware of Locking Vinyl Panels
When applying a siding patch kit near panel lap joints or seams, never glue two overlapping siding courses together. Siding is designed to “float” horizontally on wall nails as temperatures change. If you accidentally glue two panels together with high-strength patch compound, normal summer expansion will buckle the surrounding wall, creating a much larger structural problem.
Choosing Between a Patch Kit and Full Panel Replacement
While a siding patch kit is a lifesaver for fast, economical repairs, it isn’t a magic wand for every situation. Here is a quick breakdown to help you decide:
| Condition / Damage Type | Recommended Fix | Why? |
| Small holes (< 3 inches) | Siding Patch Kit | Fast, cost-effective, preserves original installation. |
| Hairline cracks | Siding Patch Kit / Exterior Sealant | Prevents water penetration without structural teardown. |
| Long splits (> 8 inches) | Full Panel Replacement | Material integrity is lost; patch will fail over time. |
| Melting / Heat Distortion | Full Panel Replacement | Structural shape is warped beyond patching capability. |
| Deep Sheathing Rot | Contractor Inspection + Full Repair | Indicates long-term hidden water damage underneath. |
Take Action: Protect Your Property Today
Maintaining your home’s exterior infrastructure isn’t about grand architectural overhauls—it’s about staying vigilant with small, proactive maintenance tasks. By keeping a quality siding patch kit in your home workshop and addressing minor breaches as soon as they appear, you safeguard your foundation, keep energy costs low, and retain your home’s curb appeal for decades.
Take a quick walk around your house this weekend. Look closely near garden beds, driveway edges, and high-traffic yards. Have you discovered a pesky crack or hole in your exterior walls?
Drop a comment below with the type of siding you have, or share your DIY repair challenges—I’d love to help you troubleshoot your exterior maintenance projects!








+ There are no comments
Add yours