






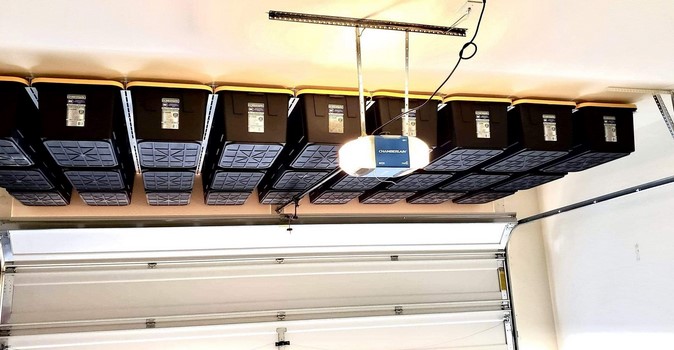
You pull into your garage after a long day, but instead of a sanctuary for your car, you’re greeted by a mountain of plastic totes, holiday decorations, and camping gear that hasn’t seen the light of day in three years. You’re effectively paying a mortgage on a room for your “stuff” while your expensive vehicle sits in the driveway, exposed to the elements. Statistics show that while 80% of homes have a garage, only about 25% of homeowners can actually fit a car inside them.
In my twelve years of optimizing residential spaces, I’ve realized that most people look at their garage horizontally when they should be looking vertically. We tend to treat the floor like a giant junk drawer. However, the real “real estate” is floating right above your head. That’s where the Garage Bin Slide system comes in—a mechanical solution that turns wasted air into a high-capacity warehouse.
The Logistics of Vertical Real Estate
The concept of a Garage Bin Slide is simple but brilliant: it’s a rail-based system mounted to your ceiling joists that allows heavy-duty storage bins to slide in and out like drawers in a dresser. By utilizing the “overhead utility” of your garage, you are reclaiming the floor for its original purpose—parking and projects.
I remember my first major garage overhaul back in 2016. The client had thirty identical black-and-yellow totes stacked five high. Every time they needed a specific tool from the bottom bin, it was an hour-long game of “Tetris” that usually ended with a sore back. When we installed a custom ceiling slide system, that hour became thirty seconds. We didn’t just organize their stuff; we gave them their Saturday afternoons back.
The Dresser-on-the-Ceiling Analogy
Think of your garage ceiling like a giant, upside-down dresser. Without a Garage Bin Slide, your storage is just a pile of clothes on the floor. With the rails, every bin has a “slot.” You can access the “socks” (holiday lights) without moving the “jeans” (the heavy camping stove). It turns a chaotic pile into a functional library of assets.
Engineering the Overhead System: Weight and Structural Integrity
Before you start drilling into your ceiling, you have to understand the technical “why” behind the installation. This isn’t just about hanging a few hooks; it’s about managing dynamic and static loads.
1. Identifying the Joist Direction
Your garage ceiling is held up by wooden beams called joists. To install a Garage Bin Slide, you must mount the rails perpendicular to these joists or directly into the center of them. In my experience, using a high-quality deep-scan stud finder is non-negotiable. If you miss the “meat” of the wood, you’re not building storage—you’re building a trap that will eventually fall on your car’s hood.
2. Weight Capacity and Leverage
Standard overhead systems are usually rated for 35 to 75 pounds per bin. While the rails might be steel, the limiting factor is often the plastic lip of the bin itself. I always tell my clients: “The rail won’t break, but the bin might.”
-
Pro Tip: Always use heavy-duty, reinforced rim bins (like the 27-gallon industrial totes). Cheap, thin plastic bins will eventually “stretch” under the heat of a summer garage and slip out of the rails.
Selecting the Right Garage Bin Slide for Your Setup
There are two main ways to approach this: DIY wood rails or prefabricated steel systems.
Prefabricated Steel Rails
These are the gold standard for durability. They are powder-coated to prevent rust and often feature a safety locking mechanism that prevents the bin from sliding out too far. If you are a beginner, go with steel. The precision engineering ensures the bins slide smoothly without binding.
Custom Wood Rails (The Professional’s DIY)
We often build these using high-quality 2x4s and 3/4-inch plywood “cleats.” This allows us to customize the spacing for non-standard bin sizes. However, wood expands and contracts with humidity. If you live in a damp climate, wood rails can become “sticky,” making it a workout just to get a bin down.
Installation Logistics: A Step-by-Step Approach
Scaling your storage capacity requires a bit of geometry and a lot of patience. Here is how I approach a standard 3-rail setup:
-
The Master Measurement: Measure the width of your bin just under the top lip. Add 1/4 inch for “play.” This is your rail spacing.
-
Chalk the Lines: Use a chalk line to mark your joists. This ensures your screws are hitting the center of the wood across the entire span of the garage.
-
The Pilot Hole: Never drive a large lag bolt into a joist without a pilot hole. Wood can split, and a split joist is a compromised ceiling.
-
Leveling: Garages are rarely perfectly level. Use a laser level if you have one. If the rails are tilted, your bins will either be hard to push in or, worse, they’ll slowly slide out on their own.
Expert Advice: The “Hidden” Clearance Rule
One thing I see people overlook constantly is the garage door opener and the door’s travel path.
Always measure the “clearance height” when your garage door is fully open. I’ve seen homeowners install a beautiful Garage Bin Slide only to realize they can’t open their garage door because the bins are hanging too low. You need a minimum of 2-3 inches of clearance between the top of the open garage door and the bottom of your storage bins.
Expert Advice on Bin Labeling
Since you are looking at the bottom of the bins from the floor, labeling the sides is useless.
-
Pro Insight: Use a large permanent marker or a label maker to put the contents on the bottom of the bin. When you look up, you should see “HALLOWEEN” or “PLUMBING TOOLS” staring back at you.
Maintenance and Long-Term Safety
A ceiling-mounted system is a “set it and forget it” project for most, but I recommend a quick annual inspection.
-
Check the Bolts: Changes in temperature can cause wood to shrink and expand, occasionally loosening lag bolts. Give them a quick turn once a year to ensure they are still snug.
-
Lubricate the Tracks: A tiny bit of dry silicone spray on the rails once a year will keep the bins sliding like they’re on ice. Avoid WD-40, as it can attract dust and turn into a sticky paste over time.
-
Load Balancing: Don’t put all your heavy power tools on one end of the rail. Distribute the weight to keep the stress on your ceiling joists even.
Summary: Reclaiming Your Floor
The Garage Bin Slide is more than just a storage hack; it’s a lifestyle upgrade. By maximizing your overhead utility, you transform your garage from a cluttered warehouse into a functional part of your home. You gain space for a workshop, a gym, or—heaven forbid—actually parking your car indoors.
In my decade of home improvement, I’ve found that the most satisfied clients aren’t the ones with the biggest houses, but the ones who use every cubic inch of the house they have. Start looking up, and start sliding those bins out of the way.
Are you ready to stop tripping over your holiday decorations and start using your ceiling? Or maybe you’re worried about the weight limit for your specific ceiling type? Drop a comment below with your garage dimensions, and let’s figure out the best slide configuration for your space!















+ There are no comments
Add yours