




You walk into your guest bathroom, flip on the light, and are instantly hit by a blast from the past: 1970s avocado-green or dusty pink ceramic wall tiles. The grout lines are permanently stained, the color scheme clashes with everything you own, and the entire space feels incredibly dated. You call a local contractor for a quote to rip it all out, and your jaw drops when they estimate $8,000 and two weeks of absolute chaos, dust, and disrupted plumbing.
Before you take a sledgehammer to your walls or drain your savings account, you need to know that there is a smarter, non-destructive way to modernize your space over a single weekend.
Over my ten years as a home improvement expert specializing in flipping properties and optimizing rental assets, I have overseen dozens of bathroom gut-jobs. But my absolute favorite professional milestone was realizing that you don’t always need to demolish a room to completely transform it.
When a client’s budget is tight, I bypass the tile saw entirely and reach for a high-performance chemical alternative: a premium tile paint kit. When executed with strict adherence to chemical prep work, this budget-friendly asset refurbishment strategy delivers a sleek, factory-smooth finish that fools even experienced appraisers.
The Chemical Bonding Layer: How Tile Paint Actually Works
To understand why a specialized kit succeeds where regular latex wall paint fails catastrophically, we have to look at the material science of smooth ceramics. Glazed ceramic or porcelain tiles are engineered to be non-porous and glassy, making it nearly impossible for standard coatings to grip the surface.
The Ice Rink Analogy
Think of your glazed shower surround as a freshly surfaced, perfectly smooth sheet of ice. If you try to paint directly onto that slick ice with a standard paintbrush, the wet paint will simply bead up, run down, and peel away the second it dries.
A professional-grade tile paint kit acts like a chemical micro-cleat for the surface.
These kits typically utilize an advanced two-part epoxy acrylic or a high-durability polyurethane formula. When you mix the base color with the chemical catalyst/activator, it kicks off a cross-linking polymerization reaction. This allows the compound to chemically bond directly onto the smooth vitreous glaze, curing into a hard shell that resists peeling under intense moisture.
The Non-Negotiable Prep Framework: Cleaning and Abrasion
If there is one absolute truth I have learned after a decade in the trades, it is this: your finished project is only as good as your surface preparation. If you paint over soap scum, body oils, or microscopic mold spores, your beautiful new coating will bubble and peel off within six months.
-
Chemical De-greasing: Start by scrubbing every square inch of the tile and grout with a potent solution of Trisodium Phosphate (TSP) or a heavy-duty industrial de-glosser. This aggressively strips away years of accumulated hairspray, body oils, and hard water minerals.
-
Mechanical Abrasion (Sanding): Use a 220-grit wet/dry sandpaper to manually scuff the entire surface. You aren’t trying to grind down the tile; you are simply removing the high-gloss shine to create microscopic grooves for the epoxy to lock into.
-
Absolute Dehumidification: After rinsing the walls thoroughly, let the room dry completely for at least 24 hours. Running a commercial dehumidifier or a fan is crucial because any moisture trapped inside the porous grout lines will vaporize later, causing the curing paint to blister.
Step-by-Step Execution for a Factory-Smooth Finish
Achieving a professional, spray-like finish using a consumer-grade tile paint kit requires patience and the correct application mechanics.
-
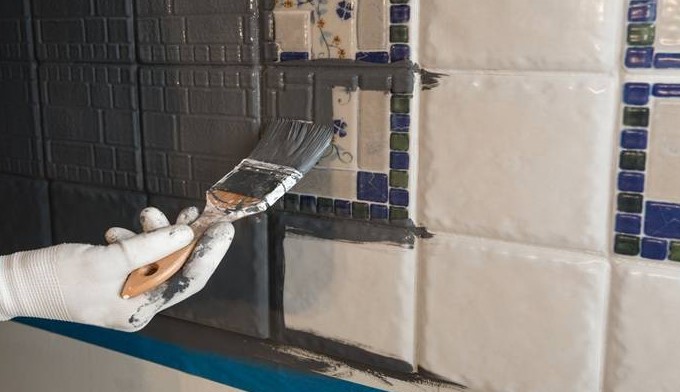
Step 1: Masking and Taping: Use premium painter’s tape to protect your tub edges, vanity, and drywall boundaries. Slice away old, moldy silicone caulk completely using a utility knife before painting, as epoxy will not adhere to silicone.
-
Step 2: Mixing the Catalyst: Open the two cans provided in your kit (the resin base and the activator). Pour the activator into the base, stirring thoroughly for a full 5 minutes to ensure the chemical reaction is evenly distributed throughout the batch.
-
Step 3: Rolling the First Coat: Use a high-density, shed-resistant foam roller or a high-quality nylon brush for the edges. Apply a very thin, uniform first coat. Do not panic if it looks slightly transparent or streaky on pass one; this is your foundational anchoring layer.
-
Step 4: The Curing Intermission: Allow the first coat to dry for the exact duration specified by the manufacturer (typically 1 to 2 hours) before applying the second coat. This second pass will provide complete opacity and structural depth.
[Trapped Glaze Surface] -> [220-Grit Micro-Grooves] -> [Epoxy Anchor Coat] -> [Opaque Top Shell]
         │                          │                         │                    │
         ▼                          ▼                         ▼                    ▼
   Slick Vitreous             Mechanical Grip           Polymer Bond         Smooth Finish
Financial Comparison: Demolition vs. Refurbishment
| Refurbishment Metric | Full Structural Demolition & Retiling | Two-Part Tile Paint Kit Project |
| Average Project Cost | $3,500 – $8,000+ (Labor, materials, disposal) | $80 – $150 total investment |
| Time to Completion | 7 to 14 Days (Invasive construction zone) | 2 to 3 Days (Weekend DIY project) |
| Required Tools | Tile saw, mortar trowels, grout floats, hammer | Foam rollers, painter’s tape, sandpaper, TSP |
| Asset Lifespan | 20+ Years | 5 to 10 Years (Before requiring a touch-up) |
Expert Advice for Long-Term Maintenance
💡 Pro Tip: The Hidden Curing Window Trap
Throughout my career, the most common mistake intermediate DIYers make is mistaking the term “dry to the touch” for “fully cured.” While your newly painted tile wall might feel completely dry and usable after 24 hours, the underlying epoxy chemical cross-linking process takes a full 7 to 10 days to achieve maximum hardness. If you turn on a hot, steamy shower or scrub the surface with abrasive cleaners during this critical window, you will permanently soften the coating. Give the asset a full week to cure completely before exposing it to moisture or heavy usage.
Transforming Your Assets Without the Mess
Investing in a high-quality tile paint kit is the ultimate hack for any homeowner looking to maximize their asset value while keeping refurbishment costs low. By stepping away from expensive, noisy demolition and relying instead on modern chemical bonding technology, you can easily rescue a dated space from its design era. Take your time with the deep cleaning, scuff up that old glaze, let the surfaces dry completely, and you will be rewarded with a gorgeous, high-gloss bathroom that looks brand new—all while keeping thousands of dollars right where they belong: in your bank account.
Are you ready to tackle that outdated guest bathroom or kitchen backsplash this upcoming weekend? What color scheme are you planning to choose to modernize your old tiles? Let’s map out your project steps—drop your questions or share your before-and-after goals in the comments below!




+ There are no comments
Add yours