


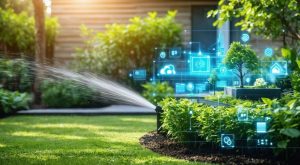
In recent years, there has been a surge in interest around sustainable and eco-friendly home projects. One such project that has gained immense popularity is creating DIY solar garden lights. Solar garden lights are not only an environmentally conscious way to illuminate your outdoor space but also a budget-friendly alternative to traditional electrical garden lighting. By harnessing the power of the sun, these lights provide energy-efficient lighting that requires minimal maintenance, is cost-effective, and reduces your carbon footprint. In this article, we will explore how you can create your own DIY solar garden lights, the benefits of using solar-powered lighting, and how to get started on your own sustainable outdoor lighting project.
The Benefits of Solar Garden Lights
Before diving into the DIY aspect, it’s important to understand why solar garden lights are an excellent choice for illuminating your yard. From energy savings to environmental benefits, there are many reasons to switch to solar-powered lighting.
1. Energy Efficiency
The most obvious benefit of solar garden lights is their energy efficiency. Unlike traditional electric lights that require an external power source, solar lights are powered entirely by sunlight. During the day, solar panels embedded in the lights absorb sunlight and convert it into energy, which is stored in rechargeable batteries. This stored energy is then used to power the lights at night. By using solar energy, you can drastically reduce your electricity bill and minimize your reliance on nonrenewable energy sources.
2. Eco-Friendly and Sustainable
Solar garden lights are a sustainable option that contributes to reducing your environmental impact. They do not require electricity from fossil fuels and, since they run on solar energy, they emit no carbon emissions. Furthermore, many solar lights are made from recyclable materials, and their long lifespan means fewer replacements, reducing overall waste. Using DIY solar garden lights is a great way to make your garden not only beautiful but also eco-conscious.
3. Low Maintenance and Long Lifespan
Once installed, solar garden lights require very little maintenance. Since they do not need wiring or external power sources, there’s no need to worry about frequent repairs or electricity costs. The rechargeable batteries in the lights typically last for several years, and the solar panels are designed to withstand outdoor weather conditions. This low-maintenance feature makes them ideal for anyone who wants to create an effortlessly lit garden with minimal effort.
How to Make DIY Solar Garden Lights
Creating your own DIY solar garden lights can be a fun and rewarding project that adds a personal touch to your garden. You don’t need to be an expert in electrical work or have advanced crafting skills—just a few basic materials and some creativity. Below, we’ll walk you through the basic steps of making your own solar garden lights.
Materials You Will Need
- Solar Lights: You can repurpose old solar garden lights or buy individual solar light kits. These kits typically include the solar panel, battery, and light fixture.
- Glass Jars, Bottles, or Lanterns: You’ll need a container to house the light. Glass jars, mason jars, or even old wine bottles work perfectly. These containers will protect the solar lights from the elements while also giving them a decorative look.
- Hot Glue Gun: This will be used to secure the solar light to your container.
- Decorative Materials: Depending on your style, you can use items like pebbles, seashells, twine, or lace to decorate the jars or bottles.
- Scissors or Craft Knife: For cutting materials and making adjustments to your containers.
- Optional: Paint or Decorative Tape: If you want to give your containers a colorful or textured look, paint or decorative tapes are great choices.
Step-by-Step Instructions
- Prepare the Container: Clean your jar, bottle, or lantern thoroughly to ensure it’s free from dust and dirt. If you are using a mason jar, you may want to remove the lid for easy installation of the solar light. You can paint or decorate the container if you’d like to add a personalized touch.
- Remove the Solar Light from the Holder: If you are using an old solar garden light, carefully remove the solar light from its stake or holder. You may need to gently pull or unscrew the light depending on the design.
- Attach the Solar Light: Using a hot glue gun, apply a generous amount of glue to the base of the solar light and press it onto the top of your container. Make sure the solar panel is facing upward, as this will allow it to absorb the most sunlight. Hold it in place for a few moments until the glue has set.
- Add Decorative Touches: Now comes the fun part! Use decorative materials such as pebbles, twine, lace, or ribbon to dress up your container. You can glue pebbles around the base for a rustic look, wrap twine around the neck of a bottle, or add a colorful ribbon for a more festive vibe.
- Place in the Garden: Once the glue has dried and the decorations are secure, your DIY solar garden lights are ready to be placed in the garden. Choose spots where they will get plenty of sunlight during the day, such as along walkways, around trees, or near garden beds.
- Enjoy Your Illuminated Garden: When the sun sets, your solar lights will automatically turn on, casting a warm and inviting glow over your garden. The lights will recharge during the day, ready to light up your yard again the next evening.
Tips for Maximizing the Effectiveness of Your DIY Solar Garden Lights
To get the most out of your DIY solar garden lights, here are some tips to ensure they perform well and last for a long time:
- Place Lights in Sunlit Areas: Ensure that your solar lights are placed in areas where they will receive adequate sunlight during the day. A location with at least 6 hours of direct sunlight is ideal.
- Clean the Solar Panels Regularly: Over time, dust and debris can accumulate on the solar panel, reducing its ability to charge. Clean the panels with a soft cloth every few weeks to keep them working efficiently.
- Use LED Bulbs: Many solar light kits come with LED bulbs, which are energy-efficient and have a longer lifespan than traditional bulbs. If your DIY lights don’t already have LEDs, consider swapping them for a more sustainable option.
- Combine Lights with Other Landscaping Features: For a more dramatic effect, combine solar lights with other garden elements like fountains, statues, or flower beds. This will enhance the aesthetic appeal of your garden while also providing functional lighting.
In conclusion, DIY solar garden lights offer an excellent way to add sustainable, eco-friendly lighting to your outdoor space. By using solar power, you can reduce your energy consumption, lower your electricity bills, and minimize your environmental impact—all while enhancing the beauty of your garden. The process of creating your own solar lights is simple, enjoyable, and customizable, allowing you to create unique lighting designs that reflect your personal style. As you incorporate these sustainable lighting options into your yard, you can enjoy the beauty of nature and the satisfaction of knowing that you’re contributing to a greener, more sustainable future.


+ There are no comments
Add yours