





I still vividly remember walking into a client’s garage six years ago to assess a backyard landscaping project. As I stepped over a tangled pile of rusty shovels, edging shears, and tangled hose reels, I heard a sharp crack. I had just crushed the head of a high-end, forged steel bypass lopper that was buried underneath a bent rake.
That single split second cost the homeowner $85, but the real tragedy was preventable. In my ten-plus years of designing, building, and optimizing residential workshops and garden setups, I have learned a fundamental truth: gardeners rarely ruin their equipment through heavy use. They ruin it through terrible storage.
If you leave your long-handled tools leaning against a damp concrete wall or piled in a corner, you are inviting moisture damage, rust, and dull blades. Transforming your shed or garage from a chaotic dumping ground into a streamlined workspace starts with a single, highly strategic upgrade: the dedicated garden tool rack.
The Hidden Cost of Tool Chaos: Why Floor Storage Is Ruining Your Gear
Leaving your garden tools resting directly on a concrete floor is the fastest way to destroy high-quality steel and wood. Concrete acts like a giant sponge, drawing moisture up from the ground and trapping it against metal tool heads and wooden handles.
Over a single winter season, ambient humidity triggers ambient soil oxidation on uncleaned shovel heads. Meanwhile, wooden handles absorb moisture, swell, dry out, and eventually split under pressure when spring digging begins.
Think of your tool collection like a fleet of aircraft. You would never park a precision machine outside in the mud between flights—you keep it in a hangar, inspected, elevated, and ready for immediate deployment. Installing a heavy-duty garden tool rack elevates your assets off the ground, protects cutting edges from chipping against each other, and halts moisture transfer dead in its tracks.
Choosing the Right Garden Tool Rack for Your Space Architecture
Not all storage systems are created equal, and choosing the right setup depends entirely on your available square footage, wall construction, and inventory volume.
+-----------------------------------------------------------------------+
|                    GARDEN TOOL RACK SELECTION MATRIX                  |
+-----------------------------------------------------------------------+
| Rack Style            | Best For            | Primary Advantage       |
+-----------------------------------------------------------------------+
| Wall-Mounted Rails    | Small Garages/Sheds | Zero floor footprint    |
| Freestanding Towers   | Rental Properties   | No drilling required    |
| Corner Rack Units     | Tight Storage Nooks | Uses dead space         |
| Heavy-Duty Metal Grid | Professional Gear   | High load capacity      |
+-----------------------------------------------------------------------+
1. Wall-Mounted Rail Systems (The Vertical Space Saver)
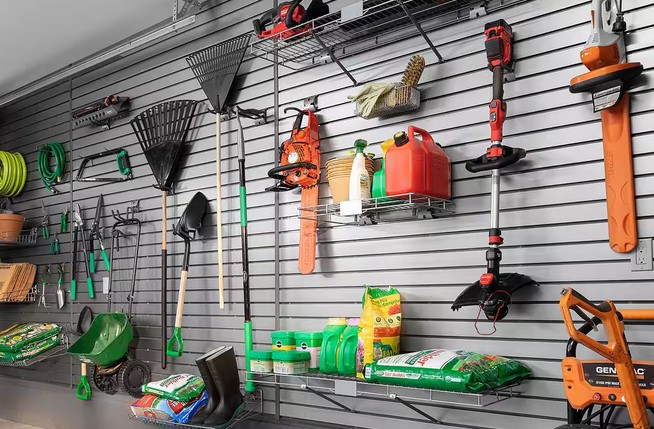
Wall-mounted systems utilize horizontal steel or aluminum tracks equipped with adjustable rubberized hooks and tension clamps. They maximize unused vertical wall space, keeping long-handled tools like hoes, pitchforks, and shovels completely suspended above ground level.
2. Freestanding Mobile Tool Towers
If you are renting your home or dealing with weak drywall where stud-drilling isn’t an option, a freestanding resin or steel tower is your best bet. These units sit directly on the floor and feature slotted tops that allow you to drop tools in vertically from above.
3. Corner Utility Racks
Corner space in garages and sheds is almost always wasted. A triangular corner garden tool rack transforms an awkward 90-degree intersection into a high-density holding bay for up to 15 to 20 long-handled implements.
Material Breakdown: Wood vs. Steel vs. Heavy-Duty Polymers
When selecting your rack, payload capacity and environmental durability are paramount. The microclimate inside a shed or unheated garage experiences severe temperature swings and humidity shifts.
-
Galvanized or Powder-Coated Steel: This is my absolute top recommendation for durability. Powder coating prevents the rack itself from rusting, while steel frames easily support heavy cast-iron diggers and sledgehammers without sagging.
-
Heavy-Duty ABS Polymers: Molded plastic racks will never rust or corrode, making them ideal for high-humidity coastal regions. However, they can become brittle under extreme sub-zero winter temperatures if overloaded.
-
Finished Hardwood: Wooden racks offer a classic, craftsman aesthetic that looks beautiful in a potting shed. Just ensure the wood is sealed with polyurethane or linseed oil to prevent rot.
Strategic Asset Placement: How to Organize Your Tools Like a Logistics Pro
Once you have chosen your garden tool rack, layout strategy dictates how efficiently you will work. Throwing tools onto hooks randomly defeats the purpose of systematic organization.
+-------------------------------------------------------------------+
|               OPTIMAL TOOL PLACEMENT LOGISTICS FLOW               |
+-------------------------------------------------------------------+
| TOP ZONE: Lightweight gear, pruners, hand trowels, hose nozzles  |
| MID ZONE: Daily drivers (brooms, bypass loppers, garden hoes)     |
| LOW ZONE: Heavy assets (spades, mattocks, post-hole diggers)      |
+-------------------------------------------------------------------+
Organize your rack using these proven logistical rules:
-
Group by Functional Frequency: Place your “daily drivers”—like your bypass pruners, garden hoe, and bow rake—at shoulder height in the center of the rack for rapid access.
-
Distribute Structural Weight: Heavy tools like mattocks, trenching spades, and post-hole diggers generate high shear stress on mounting hardware. Position these heavy items closest to the wall studs or support posts.
-
Isolate Cutting Edges: Turn sharp blades, hedge shears, and edgers inward toward the wall or enclose them in leather sheaths to prevent accidental contact when reaching for adjacent gear.
Hidden Warning: The Mud TrapNever hang a dirty tool on your rack. Dried mud contains trapped organic moisture and microorganisms that actively corrode steel edges while sitting idle on the wall. Always scrape off soil and wipe down tool heads with an oiled rag before hanging them up.
Step-by-Step DIY Guide: Mounting a Heavy-Duty Garden Tool Rack Securely
Installing a wall-mounted garden tool rack is a simple weekend project, but doing it wrong can result in an entire wall of steel crashing down on your vehicle or equipment.
Step 1: Locate and Mark Wall Studs
Never rely on standard plastic drywall anchors to hold a loaded tool rack. Use a magnetic or electronic stud finder to locate the center of two vertical wall studs (typically spaced 16 inches apart).
Step 2: Level and Anchor the Mounting Track
Hold the main steel rail across the marked studs. Place a spirit level on top of the rail, adjust until perfectly horizontal, and mark your drill points directly over the stud centers.
Step 3: Drive High-Strength Lag Screws
Pre-drill pilot holes using a bit slightly smaller than your fasteners to prevent splitting the interior timber. Secure the rail using 2.5-inch heavy-duty structural wood screws or lag bolts with washers.
Step 4: Load Test and Position Hooks
Before hanging your expensive equipment, grab the mounted rail with both hands and apply firm downward pressure. Once confirmed stable, snap your rubberized hooks into place and begin loading your tools from heaviest to lightest.
Pro Tip: The Linseed Oil ProtocolEvery fall before hanging long-handled tools on your rack for winter storage, rub a thin layer of boiled linseed oil over wooden handles and wipe down steel heads with a light coat of WD-40 or 3-in-1 machine oil. This creates an airtight protective barrier against offseason rust and drying.
Transforming Your Gardening Workflow
When your equipment is systematically organized on a dedicated garden tool rack, something psychological shifts. You no longer dread the setup and cleanup phases of yard work. You know exactly where every asset lives, every tool is clean and sharp, and you save hours of wasted time searching through garage clutter.
Invest an afternoon into building a proper storage structure today. Your tools, your lower back, and your project turnaround times will thank you for years to come.
Over to You!
How are you currently storing your long-handled gardening equipment? Have you built a custom wall rack, or are you fighting for space in a crowded garage corner? Drop your questions, tips, or storage photos in the comments section below—I’d love to help you troubleshoot your workspace layout!










+ There are no comments
Add yours