


Step outside and take a hard look at your front lawn. If you are like most homeowners, you are looking at a hyper-manicured, bright green carpet of turfgrass. Now, think about your last water bill, or those agonizing weekend hours spent pushing a noisy mower in the blistering summer heat. Here is a staggering reality check: according to environmental data, residential outdoor water use accounts for nearly 30% of a household’s total water consumption, and in dry regions, that number can skyrocket to a whopping 60%.
In my 10+ years as a home improvement expert, I have stood on hundreds of parched lawns, watching homeowners literally pour hard-earned money down the drain just to keep an unnatural ecosystem on life support. The constant cycle of heavy watering, chemical fertilizing, and endless mowing is exhausting.
The good news? You can break free from this cycle without turning your yard into a barren, depressing desert. By embracing a Xeriscape DIY project, you can create a stunning, vibrant landscape that thrives with nature rather than fighting against it, all while slashing your utility bills.
What is Xeriscaping? (Spoiler: It’s Not Just Rocks and Cactus)
When I mention “xeriscaping” to clients, their minds often drift to a stark, hot landscape filled with nothing but gravel and prickly cacti. That is a massive misconception. The term comes from the Greek word xeros, meaning dry, combined with landscape.
Expert Analogy: Think of traditional landscaping like driving a classic, gas-guzzling muscle car—it requires constant fuel (water) and high-maintenance tuning just to stay running. A Xeriscape DIY design is like upgrading to a sleek, modern hybrid. It uses smart engineering to travel the exact same distance while consuming a fraction of the resources.
At its core, xeriscaping is a comprehensive design philosophy based on seven fundamental principles: sound planning, soil improvement, efficient irrigation, appropriate plant selection, practical mulch use, limited turf areas, and proper maintenance.
Phase 1: Planning and Soil Prep for Your Xeriscape DIY
The single biggest mistake I see enthusiastic DIYers make is running straight to the local nursery, buying whatever looks pretty, and shoving it into the ground. A successful Xeriscape DIY lives or dies in the planning phase.
Mapping Your Yard’s Microclimates
Before picking up a shovel, grab a notepad and observe your yard at different times of the day. You need to identify your yard’s unique zones:
-
The Sizzlers: Areas that receive 6+ hours of intense, direct afternoon sun.
-
The Oases: Low-lying zones where rainwater naturally collects or areas shaded by mature trees.
-
The Wind Tunnels: Exposed sections where moisture evaporates rapidly due to air movement.
Grouping plants together based on their shared water and sunlight needs is a technique known as hydrozoning. This ensures you aren’t accidentally drowning a drought-tolerant succulent or starving a moisture-loving fern.
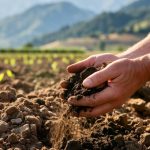
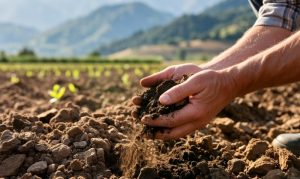
The Foundation: Amending the Soil
If your soil looks like concrete or drains like a sieve, your plants will suffer. In my years of field experience, I’ve learned that organic compost is the ultimate equalizer. For heavy clay soil, compost introduces oxygen and improves drainage. For sandy soil, it acts like a sponge to retain crucial nutrients.
Phase 2: Selecting the Right Plants and Limiting Turf
This is where the magic happens. Your goal is to drastically reduce or entirely replace high-maintenance turfgrass with a curated palette of native and drought-tolerant flora.
[Traditional Lawn: High Water, High Maintenance]
                      VS
[Xeriscape Design: Layered Native Perennials, Ornamental Grasses, Organic Mulch]
The Power of Native Species
Native plants are the ultimate cheat code for home improvement. They have spent thousands of years adapting to your specific regional climate, soil types, and pest pressures. Once established, they can practically take care of themselves.
Consider incorporating these water-wise options into your layout:
-
Perennials: Purple Coneflower (Echinacea), Lavender, Russian Sage, and Yarrow.
-
Ornamental Grasses: Blue Fescue, Switchgrass, and Little Bluestem (these add incredible texture and motion to your yard).
-
Groundcovers: Creeping Thyme or Sedum—perfect replacements for traditional grass pathways.
Redefining Your Lawn Space
You don’t have to banish grass entirely if you have kids or pets. Instead, treat turfgrass like an area rug rather than wall-to-wall carpeting. Confine the grass to a small, functional zone and surround it with expansive, water-efficient garden beds.
Phase 3: Smart Irrigation and Mulching Strategies
Even a drought-tolerant garden needs a little help getting started. The secret to long-term resource efficiency lies in how you deliver water and how well you trap it in the earth.
Switching to Drip Irrigation
Ditch the traditional oscillating overhead sprinklers. They lose an immense amount of water to wind drift and evaporation before a single drop even hits the roots.
For an effective Xeriscape DIY upgrade, install a drip irrigation system or use soaker hoses. These systems deliver water directly to the base of the plants, keeping the foliage dry (which prevents fungal diseases) and ensuring deep root penetration.
The Magic of Mulch
If plants are the stars of the show, mulch is the unsung hero working tirelessly backstage. A thick, 3-inch layer of organic mulch (such as shredded bark or arborist wood chips) performs three critical tasks:
-
It suppresses aggressive weed growth.
-
It regulates soil temperature against extreme heat.
-
It reduces soil evaporation by up to 70%.
Insider Insights: Pro Tips and Hidden Pitfalls
Over the past decade, I have guided countless homeowners through sustainable renovations. Here are the hard-learned truths you won’t always find on basic gardening blogs:
-
The “First Year” Trap: I cannot stress this enough—drought-tolerant does not mean “zero water” from day one. New plants require regular watering during their first one to two growing seasons to establish a deep, resilient root system. Treat them gently at first, then slowly taper off the water.
-
The Gravel Warning: Many beginners think replacing a lawn with a massive sheet of landscape fabric and crushed river rock is the ultimate low-maintenance move. Don’t do it. Large expanses of gravel act like a giant radiator, absorbing solar heat and cooking your house and surrounding plants. Plus, weed seeds will eventually blow into the rocks and sprout anyway. Stick to organic wood mulches for a cooler, healthier ecosystem.
-
Grading for Rainwater: When prepping your beds, create slight depressions or swales. This allows you to catch and harvest natural stormwater runoff, guiding it directly to your deep-rooted plants rather than letting it wastefully flow into the street storm drains.
Transforming Your Canvas: A Sustainable Weekend Project
| Step | Complexity | Time Commitment | Estimated Cost |
| 1. Site Mapping & Design | Low | 2–4 Hours | Free |
| 2. Turf Removal & Soil Prep | Medium to High | 1 Weekend | Low to Moderate |
| 3. Drip Irrigation Setup | Medium | 1 Day | Moderate |
| 4. Planting & Mulching | Low to Medium | 1 Weekend | Variable (Plant dependent) |
Taking on a Xeriscape DIY project is one of the most rewarding investments you can make in your home. You are not just upgrading your curb appeal; you are actively contributing to local water conservation efforts, creating a haven for native pollinators, and putting money back into your own pocket.
It’s time to trade in the exhausting weekend chores for a beautiful, self-sustaining yard that lets you actually relax and enjoy your outdoor living space.
Are you ready to transform your yard? What is the biggest challenge holding you back from replacing your lawn—is it choosing the right plants, setting up irrigation, or simply knowing where to start digging? Drop a comment below, and let’s map out your sustainable landscape transition together!


+ There are no comments
Add yours